
Table of Contents
- Why Your Tactical Backpack Feels Like a Black Hole
- The Core Principle: Weight Distribution and Center of Gravity
- Tactical Backpack Loadout Essentials: The Zone System
- A Practical MOLLE Attachment Guide for Modular Pouches
- The Best Tactical Backpack Organizers for Internal Storage
- Hydration Integration and Gear Retention
- Common Packing Mistakes That Ruin Your Back and Your Mission
- Maintenance: Zipper Care and Spot-Cleaning for Longevity
- Frequently Asked Questions
Last Updated: September 9, 2026
Most tactical backpack owners carry the same few items in the same disorganized heap, digging through a dark main compartment every time they need a light or a map. Tactical backpack organization tips are not about buying more gear; they are about assigning every item a deliberate home so your pack works with you instead of against you. The goal is to balance weight, protect your gear, and give you instant access to critical tools. Below, we show you how to structure your pack using a zone system, MOLLE webbing, and modular pouches.
Why Your Tactical Backpack Feels Like a Black Hole
A black-hole backpack happens when you treat the main compartment as one giant storage bin. Tactical packs come with compression straps, internal pockets, and PALS grid webbing precisely so you can compartmentalize, yet most users ignore these features.
The root cause is a lack of a system. When everything goes in loose, small items sink, heavy items crush lighter ones, and you unpack half the bag to find a flashlight. The fix is a repeatable layout that puts every category of gear in a fixed position.
The Core Principle: Weight Distribution and Center of Gravity
Proper tactical backpack organization starts with weight distribution. The heaviest items belong closest to your back and centered between your shoulder blades, keeping your center of gravity stable and reducing strain.
A common mistake is loading heavy gear at the very bottom, pulling the center of gravity low and away from your body. Instead, pack dense items high and tight against your frame, and let lighter, bulkier items sit lower and further out.
Tactical Backpack Loadout Essentials: The Zone System
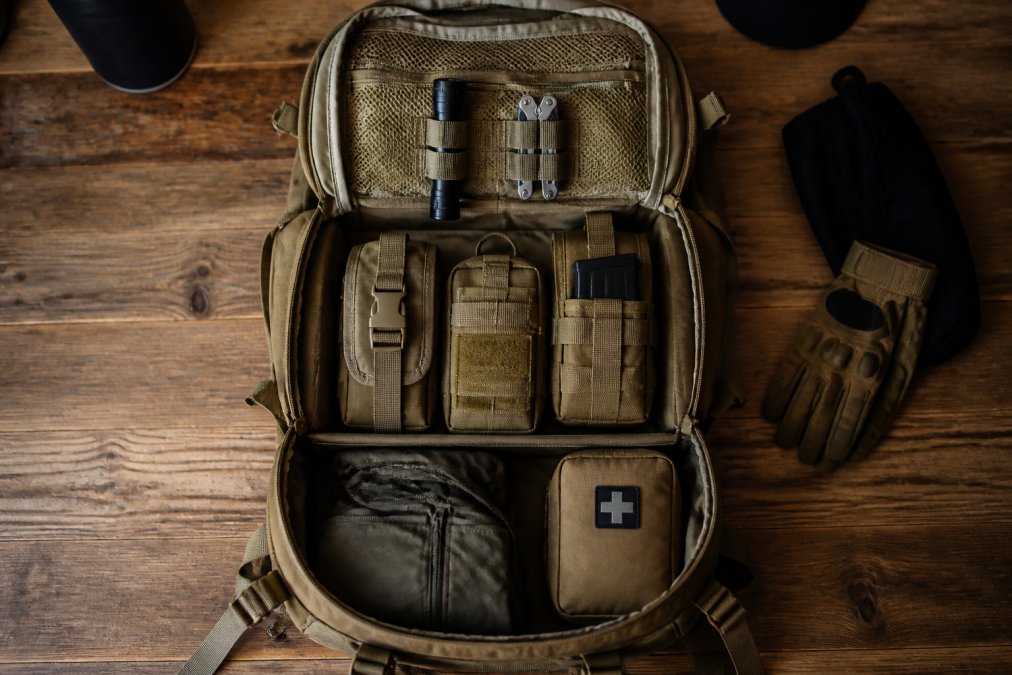
The three-zone system is the structural skeleton, but the real utility comes from what you put in each zone for a specific mission. Here are concrete loadout checklists for three scenarios: a 24-hour urban EDC, a weekend field operation, and a backcountry emergency kit. Each list assumes a 25-35 liter pack.
Scenario 1: 24-Hour Urban EDC
- Zone 1 (Quick Access): A slim admin pouch holding a pen, a small notepad, a USB drive with encrypted backups, and a folding knife (check local carry laws). A phone with a spare battery bank goes in the top pocket, not buried.
- Zone 2 (Mid-Layer): A compact rain shell (e.g., a Patagonia Torrentshell or similar), a small first-aid kit with blister care and ibuprofen, and a legal pad or tablet for work. A lightweight charger with a 10,000 mAh capacity covers a full day of phone use.
- Zone 3 (Heavy Base): A change of clothes in a compression cube, a pair of low-profile sneakers, and a lockable cable for securing the pack to a chair or post. These items are heavy and rarely needed mid-day, so they sit low and close to your back.
Scenario 2: 48-Hour Field Operation
- Zone 1 (Quick Access): A headlamp (e.g., a Petzl Actik Core), a compass with a sighting mirror, a multi-tool (e.g., a Leatherman Wave Plus), and a signal whistle. A small GPS unit or a printed topo map in a waterproof case also lives here.
- Zone 2 (Mid-Layer): A stove system (e.g., a Jetboil Flash) with one fuel canister, a freeze-dried meal for two days, a water filter (e.g., a Sawyer Squeeze), and a lightweight tarp or bivy sack. These are bulky but not heavy, so they sit in the middle, away from your spine.
- Zone 3 (Heavy Base): A sleeping bag rated to 30°F, a closed-cell foam pad, and a 3-liter hydration bladder in its dedicated sleeve (rei.com). The sleeping bag goes at the very bottom, compressed to about 8 liters of volume, to keep the center of gravity low and stable.
Scenario 3: 72-Hour Emergency Kit
- Zone 1 (Quick Access): A hand-crank radio with a USB port, a headlamp, a multi-tool, and a waterproof notepad with emergency contacts (ready.gov). A physical map of your region is non-negotiable.
- Zone 2 (Mid-Layer): A larger first-aid kit with trauma supplies (e.g., QuikClot, a tourniquet, and chest seals), a 5-gallon collapsible water container, and a water purification tablet bottle (e.g., Potable Aqua). A change of warm layers in a compression sack goes here too.
- Zone 3 (Heavy Base): A 4-person emergency blanket, a 50-foot length of 550 paracord, a multi-fuel stove, and a 3-day supply of high-calorie food bars (e.g., Clif Bars or SOS Food Labs). These are heavy and rarely accessed, so they form the stable base.
The Weight-to-Volume Ratio Rule
A common mistake is packing by weight alone, which leads to a bag that is dense but unstable. Instead, calculate the weight-to-volume ratio of each item. A 2-pound sleeping bag compressed to 6 liters has a ratio of 0.33 pounds per liter; a 2-pound stove with fuel has about 0.5 (nps.gov). Items above 0.4 pounds per liter belong in Zone 3, close to your back. Items below 0.2 (like a puffy jacket) belong in Zone 2 or 1, where they add bulk without pulling the load backward.
Zone-Specific Retention
Each zone needs a retention strategy. Zone 1 items go in a single flat zippered pouch. Zone 2 items go in labeled stuff sacks or packing cubes. Zone 3 items should be compressed and cinched with internal straps; if your pack lacks them, add a length of 1-inch webbing with a side-release buckle to hold the base layer in place.
For the urban EDC scenario, keep Zone 1 items in a dedicated front pocket, not the main compartment. This lets you access your phone and notepad without opening the main flap, which is faster and more discreet in a crowd.
A Practical MOLLE Attachment Guide for Modular Pouches
MOLLE webbing is a load-bearing system with specific rules for weight, placement, and weave technique. Most guides stop at ‘thread the strap through,’ leaving users with flopping pouches and an unbalanced pack. Here is the technical breakdown.
The Correct Weave: Over-Under, Not Over-Over
The standard weave is a single continuous strap that alternates over and under each row. Thread the strap through the top row of the pouch from the outside, under the corresponding row on the pack, then back through the next row. Pull snug after each pass. A common error is threading over both pouch and pack, creating a loose loop that catches on branches; the over-under pattern locks the pouch flat.
Weight Limits and Placement Rules
MOLLE webbing is rated to hold about 10 pounds per square foot, but that is a static rating. In practice, a pouch over 5 pounds will sag and shift. For heavy items like a radio battery, use a pouch with two attachment points and thread two separate straps. Never hang a single heavy pouch from one row.
Placement rules follow your center of gravity:
- Side panels (left and right): Best for items you need without stopping, like a radio, a water bottle, or a dump pouch. Keep the weight under 3 pounds per side to avoid widening your profile and throwing off balance.
- Shoulder straps: Reserved for ultra-light items like a pen light, a whistle, or a small admin card. Anything heavier will pull the shoulder strap down and cause chafing.
- Back panel (the area against your spine): Leave this completely clear. Any pouch here presses into your back, creates hot spots, and shifts your center of gravity away from your body. If your pack has webbing here, it is for attaching a hydration sleeve or a flat document pouch, not a bulky utility pouch.
- Front flap or lid: Good for flat items like a map case or a small admin pouch. Avoid anything that protrudes more than 2 inches, as it will catch on brush and throw off the pack’s aerodynamics.
Advanced Attachment: The Malice Clip and Swift Clip
For users who swap pouches between packs, traditional weave straps are slow. Two aftermarket solutions solve this:
- Malice Clips (by Tactical Tailor): These are rigid plastic clips that lock into the MOLLE webbing without threading. They allow you to attach or remove a pouch in under 10 seconds. They are more expensive (about $15 per set of four) and add a small amount of weight, but they are worth it if you change loadouts frequently.
- Swift Clips (by First Spear): These use a buckle system that attaches to the webbing with a single pull. They are faster than Malice Clips but require that the pouch has a compatible laser-cut laminate backing. Not all pouches support this.
The ‘No-Sag’ Technique for Heavy Pouches
If you must mount a heavy pouch (e.g., a 3-liter hydration pouch) on the side panel, use the ‘no-sag’ technique. Attach the pouch with the standard over-under weave, then run a single 1-inch strap from the top of the pouch, over the shoulder strap, and down to the front. Cinch tight. This diagonal tension line prevents the pouch from pulling the pack sideways.
What Not to Mount on MOLLE
Some items should never go on external webbing, regardless of the weave:
- Sharp tools (axes, saws): They will tear the webbing and pose a safety hazard.
- Loose clothing or sleeping bags: They add bulk and catch on branches. Use internal compression instead.
- Anything over 5 pounds: It will stress the webbing and shift your center of gravity outward, making the pack feel 20% heavier than it is.
Before every trip, inspect all MOLLE straps for fraying or loose stitching. A broken strap mid-hike can cause a pouch to swing into your leg or catch on a rock, which is a fall hazard. Replace any strap that shows wear.
The Best Tactical Backpack Organizers for Internal Storage
The best tactical backpack organizers are not a single product; they are a combination of packing cubes, pouches, and panels that create order inside a cavernous main compartment.
Packing Cubes and Pouches
Packing cubes are the fastest way to kill the black-hole effect. Use one cube for clothing, one for cooking, and one for electronics. Transparent or mesh cubes let you see contents without opening them.
Dedicated pouches work better than loose items for gear you need as a unit. A toiletry kit, a repair kit, and a cordage pouch keep small parts from scattering.
Velcro Panels and Admin Pouches
Velcro panels mounted inside the main flap turn dead space into a document center. Attach an admin pouch to hold pens, a compass, a notebook, and your ID, keeping flat items off the bottom where they get crushed.
The inside of the lid is prime real estate for items you need before fully opening the bag. A map or a small panel with elastic loops can hold a pen light or folding knife within reach.
Hydration Integration and Gear Retention
Hydration bladders are a staple of tactical loadouts. Place the bladder in the dedicated sleeve closest to your back, not loose among your gear, so its weight sits against your frame rather than pulling backward.
Route the drinking tube over your shoulder and secure it with a tube clip on the sternum strap. Gear retention goes beyond the bladder: use compression straps to hold the load tight and check all buckles and zippers before moving.
Common Packing Mistakes That Ruin Your Back and Your Mission
The most common packing mistake is ignoring weight distribution in favor of convenience. Tossing heavy items in last means they sit low and away from your back, forcing your shoulders to take the load.
Another frequent error is overloading external MOLLE pouches. Every pouch adds width and shifts the center of gravity outward, making the pack feel heavier. Keep external attachments lean. A third mistake is failing to secure loose gear, so small items migrate and create an unbalanced load.
Maintenance: Zipper Care and Spot-Cleaning for Longevity
A tactical pack is a long-term investment. Zipper care is simple: rinse the tracks with fresh water after a dusty trip, then apply a dry lubricant. Dirt and grit are the main causes of zipper failure.
For the fabric, spot-clean with a soft brush and mild soap rather than machine washing, which can damage coatings and webbing. Check MOLLE straps and buckles for fraying or cracks before each season.
| Mistake | Fix | Impact |
|---|---|---|
| Heavy gear at the bottom | Move dense items up against your back | Better balance and less shoulder strain |
| Loose small items in main compartment | Use packing cubes and modular pouches | Faster access and no lost gear |
| Overloaded external MOLLE pouches | Keep outside attachments minimal | Narrower profile and a more stable load |
| Skipping zipper and fabric care | Rinse tracks and spot-clean after trips | Longer pack life and reliable zippers |
A well-organized tactical backpack is the difference between a smooth day in the field and a frustrating one spent digging for gear. The zone system, proper weight distribution, and modular organization turn any pack into a dependable tool. At Adventurers Pulse, we select gear engineered for durability, comfort, and performance. Get started with Adventurers Pulse and build a loadout that carries exactly what you need, exactly where you need it.
Frequently Asked Questions
What should I keep in my tactical backpack?
Your tactical backpack loadout should follow a zone system based on how often you need each item. Keep quick-access items like a flashlight, multi-tool, and map in the top or front pockets. Store mission-specific gear like a first-aid kit or extra ammo in the middle. Put heavy, rarely-used items like a jacket or water filter at the bottom near your lumbar area. This approach supports proper weight distribution and prevents you from digging through layers of gear to find a headlamp.
How do I use MOLLE webbing for better organization?
Use the PALS grid on the exterior to attach modular pouches for items you need without opening the main compartment. Attach an admin pouch for pens and notepads, a utility pouch for tools, or a dedicated radio pouch. Keep the profile slim to avoid snagging on branches. Reserve the interior for heavier items that shift your center of gravity. This MOLLE attachment approach keeps your main compartment for bulkier gear and your exterior for quick-access essentials.
How do I properly pack a tactical backpack for weight distribution?
Place the heaviest items, like water bladders or heavy tools, closest to your back and in the middle of the pack, between your shoulder blades. This keeps your center of gravity stable. Lighter, bulky items like sleeping bags should sit at the bottom, and dense items like food should be packed high. Use compression straps to pull the load tight against your frame. This prevents the pack from swinging during movement and reduces strain on your shoulders.
What are the essential internal organization accessories for tactical bags?
The best tactical backpack organizers include packing cubes for clothing, a dedicated first-aid pouch, and a flat admin panel for documents. Velcro panels inside the main flap let you attach smaller organizers for EDC items. Use transparent pouches to see contents at a glance. For small items like batteries or fire starters, use a dedicated EDC organizer with elastic loops. These accessories create compartmentalization that stops small gear from sinking to the bottom of the bag.





0 Comments