
Table of Contents
- Understanding the 20% Body Weight Rule
- Weight Distribution Zones: Top, Middle, and Bottom
- Ideal Backpacking Pack Weight for Your Experience Level
- How to Adjust Backpack Straps for Comfort and Support
- Prevent Shoulder Pain While Hiking with Proper Load Transfer
- Packing Strategies for Different Terrain and Trip Length
- Common Mistakes to Avoid When Packing Your Backpack
- Conclusion
- Frequently Asked Questions
Last Updated: August 31, 2026
Understanding the 20% Body Weight Rule
The foundational principle for how to distribute backpack weight properly is the 20% body weight rule. Your total pack weight should not exceed 20% of your body weight for comfortable, sustainable hiking (peer-reviewed research). This means a 150-pound hiker should carry no more than 30 pounds, while a 200-pound hiker can manage 40 pounds (peer-reviewed research).
This guideline exists because exceeding it forces your body into unnatural postures, strains your lower back, and accelerates fatigue. The biomechanics are straightforward: when load exceeds what your frame can efficiently support, your muscles compensate by recruiting stabilizers they weren’t designed to overwork. Over hours of hiking, that compensation becomes pain.
However, experience level matters. Beginners should aim for 15-18% of body weight on their first trips. Intermediate hikers can handle 18-20%. Only experienced backpackers with strong core stability should approach the full 20% threshold. New hikers who ignore this progression often end their trips early due to discomfort or injury.
The 20% rule also accounts for terrain and duration. A 20% load on flat, well-maintained trails differs dramatically from the same weight on technical mountain passes or multi-week expeditions. Adjust your base weight expectations downward for challenging conditions.
Weight Distribution Zones: Top, Middle, and Bottom
Proper weight distribution across three zones creates the vertical alignment and center of gravity that prevents fatigue and injury. Understanding these zones transforms a heavy pack from a burden into something your body can carry efficiently.
Placing Heavy Items Close to Your Back
The middle zone, roughly between your shoulder blades and hip belt, is where heavy items belong. This zone sits closest to your spine and torso, which is your body’s natural load-bearing structure. Placing dense gear (water, food, fuel) here keeps the center of gravity tight against your body, minimizing the lever arm that strains your shoulders and lower back.
Heavy items should sit within 2-3 inches of your back (peer-reviewed research). Many hikers mistakenly place gear toward the outer edge of the pack, creating what feels like a pendulum swinging away from their body. Even a 5-pound difference in distance from your back translates to significant additional strain on your lumbar support and shoulder harness.
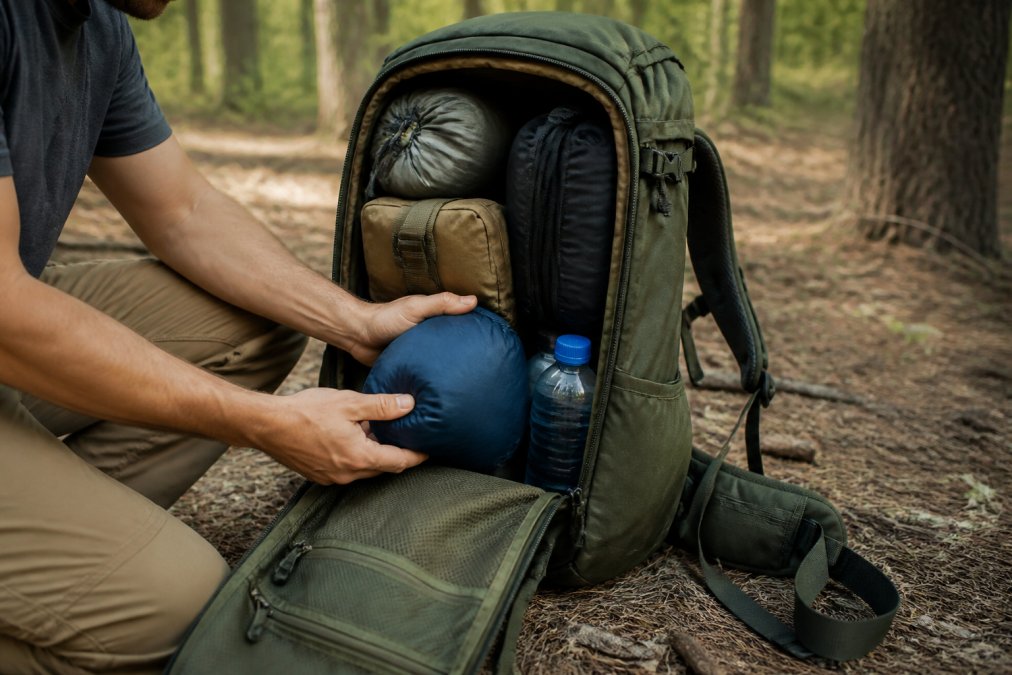
The sleeping bag typically goes in the bottom compartment but should be compressed tightly so it doesn’t shift during movement. A loose sleeping bag creates instability and forces your body to constantly micro-adjust, exhausting stabilizer muscles.
Balancing Left and Right Sides
Horizontal balance receives less attention than vertical distribution, but it’s equally critical for preventing asymmetrical muscle fatigue. A pack that’s heavier on one side forces your spine into a curve, engaging one side of your core more than the other. After hours of hiking, this creates muscle imbalances and can trigger pain on the overloaded side.
Distribute weight evenly left to right. If you’re carrying trekking poles on one side, balance them with another item on the opposite side. Water bottles should be placed symmetrically, or use a hydration bladder in the center to avoid this problem entirely. Check your pack’s stability by setting it on a table and observing whether it tips to one side.
Some packs include compression straps on both sides. Tighten these evenly to prevent the pack from shifting during movement. A shifting load forces constant micro-corrections, accelerating fatigue in ways you won’t notice until your body starts hurting.
Ideal Backpacking Pack Weight for Your Experience Level
Pack weight varies by experience, fitness, and trip type. Understanding where you fit helps you avoid carrying too much and compromising your enjoyment.
Beginners (first 3-5 trips): Target 15-18% of body weight. A 160-pound hiker should aim for 24-29 pounds total. This includes your base weight (pack, tent, sleeping bag, pad, cooking gear) plus consumables. Base weight for beginners typically ranges from 12-16 pounds before adding food and water.
Intermediate hikers (regular weekend trips): Aim for 18-20% of body weight. You’ve developed the core strength and hiking fitness to handle this range. A 160-pound hiker can comfortably carry 29-32 pounds. Intermediate base weight often falls between 10-14 pounds.
Advanced/ultralight hikers: Can approach 20% or slightly beyond if highly trained and using premium lightweight gear. However, this requires intentional conditioning and expensive equipment. Most recreational hikers find the sweet spot at 18-20%.
Trip duration matters. A 2-day trip can carry more weight per day than a 7-day expedition because you’re not carrying seven days of food. On longer trips, every ounce matters. A difference of 2 pounds across a week of hiking equals 14 pound-days of cumulative effort.
How to Adjust Backpack Straps for Comfort and Support
Proper strap adjustment is where theory meets practice. Even an excellent pack becomes uncomfortable when straps are set incorrectly. The adjustment process takes 5-10 minutes but determines whether your shoulders, hips, and back experience comfort or pain.
Setting Your Hip Belt and Load Lifters
The hip belt is your pack’s most important strap. It should sit on your iliac crest, the bony ridge at the top of your hip bones, not on your belly. When positioned correctly, the belt transfers 60-80% of pack weight to your hips and legs, sparing your shoulders and upper back.
To find the correct position: stand upright, locate your hip bones by placing your hands on your sides, and feel for the highest point of that ridge. The belt’s center should sit directly on this point. Tighten the belt firmly so it doesn’t shift during hiking. A loose hip belt defeats its purpose entirely.
Load lifters are the straps running from the top of the pack to the upper shoulder harness. They adjust the angle at which the pack sits against your back. Set them at approximately 45 degrees from the pack’s top. Load lifters that are too tight pull the pack too close to your neck; too loose and the pack sags away from your back, shifting the center of gravity downward and increasing shoulder strain.
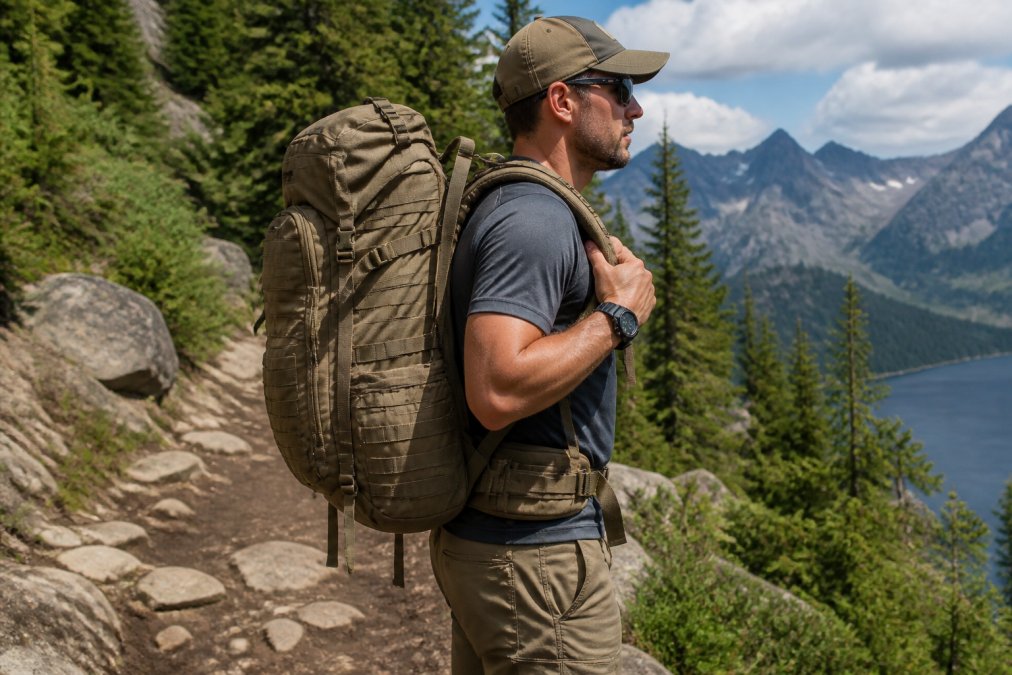
Adjust load lifters by small increments, quarter-inch at a time. Take a few steps after each adjustment to feel the difference. The pack should feel like it’s hugging your back, not pulling away or pressing too tightly against your neck.
Positioning Your Sternum Strap and Shoulder Harness
The sternum strap connects the two shoulder straps across your chest, typically 4-6 inches below your collarbone. This strap stabilizes the shoulder harness and prevents the pack from shifting side to side. Position it so it sits comfortably across your chest without restricting breathing.
Shoulder straps should be snug but not tight. They carry roughly 20-40% of pack weight; the rest goes to your hips. If shoulder straps are too tight, they restrict blood flow and cause numbness in your arms. If too loose, the pack bounces and shifts with each step, forcing your core to work harder.
The shoulder harness should follow the contour of your shoulders. Some packs offer multiple torso length settings. Measure your torso before purchasing: from the base of your neck to the top of your hip bones. A pack with incorrect torso length will never fit properly, regardless of strap adjustment.
Prevent Shoulder Pain While Hiking with Proper Load Transfer
Shoulder pain during backpacking often stems from poor weight distribution rather than pack quality. The shoulder harness is designed to stabilize the pack, not carry most of its weight. When your hip belt isn’t positioned correctly or tightened adequately, your shoulders compensate by bearing weight they weren’t designed to support.
The solution is simple: verify your hip belt is tight and positioned correctly on your iliac crest. This single adjustment prevents most shoulder pain. If pain persists despite correct hip belt positioning, your pack’s torso length may be wrong, or your load distribution within the pack may be creating an imbalanced center of gravity.
Shoulder pain can also indicate that your base fitness level doesn’t match your pack weight. A 20% load requires adequate core and shoulder strength. If you’re new to backpacking, build fitness gradually by taking progressively longer trips with gradually heavier packs over several months.
Proper spinal alignment matters too. Stand tall while hiking; slouching shifts the center of gravity forward, forcing your shoulders to work harder. Good posture, shoulders back, core engaged, head neutral, allows your body’s natural structure to support the load efficiently.
Packing Strategies for Different Terrain and Trip Length
Terrain and duration demand different packing approaches. What works for a 2-day trail hike on maintained paths differs significantly from a 7-day expedition across technical mountain terrain.
Maintained trails, 1-3 days: Prioritize accessibility. Place snacks and water where you can reach them without removing the pack. Your hip belt and load lifters do most of the work here, so focus on vertical and horizontal balance.
Technical terrain, 2-4 days: Lower your center of gravity slightly by placing heavier items in the bottom-middle of the pack rather than the absolute middle. This improves stability on uneven ground and makes quick adjustments easier when navigating rocks or roots.
Multi-day expeditions, 5+ days: Base weight becomes critical because you’re carrying 5-7 days of food. Distribute food throughout the pack rather than concentrating it in one compartment. Some ultralight hikers split food between two side pockets to improve balance and lower center of gravity.
Winter or alpine terrain: Heavier gear (insulated sleeping bag, extra layers, avalanche equipment) requires careful placement. Keep crampons and ice tools accessible but secured so they don’t shift. Insulated sleeping pads should be split between bottom and top to maintain stability.
Off-trail or bushwhacking: Your pack needs to be more compact and stable. Avoid external gear loops where branches can snag items. Keep the center of gravity lower by placing heavier items toward the bottom-middle.
The principle remains constant: dense items close to your back, distributed evenly left to right, with heaviest items in the middle zone. Adjust the exact placement based on terrain difficulty and trip length.
Common Mistakes to Avoid When Packing Your Backpack
New hikers make predictable mistakes that undermine even excellent gear. Awareness prevents pain and wasted effort.
Mistake 1: Packing the hip belt too loosely. This is the single most common error. A loose hip belt forces your shoulders to carry weight they weren’t designed to support. Tighten the belt firmly until it’s snug but not cutting off circulation. You should feel the pack’s weight settling onto your hips within 10-15 seconds of putting it on.
Mistake 2: Placing heavy items on the outside of the pack. External pockets and attachment points tempt hikers to hang gear there. Heavy items on the exterior create lever arms that strain your shoulders and destabilize the pack. Keep dense gear inside, close to your back.
Mistake 3: Overpacking consumables. Many beginners carry too much food and water. Calculate your actual needs: one liter of water weighs about 2.2 pounds; one day’s food typically weighs 1.5-2 pounds. Excess consumables are the easiest weight to eliminate.
Mistake 4: Ignoring torso length. A pack with incorrect torso length will never feel comfortable, no matter how well you adjust straps. Measure your torso before buying, and choose a pack with an adjustable or correct-fit frame.
Mistake 5: Forgetting to test-pack at home. Fill your pack completely and wear it for 30 minutes at home before your first trip. This reveals strap adjustment errors and balance problems before you’re miles from the trailhead.
Mistake 6: Assuming the heaviest items should go on top. This is backwards. Heavy items belong in the middle zone, close to your back. Light items (sleeping bag, tent) go bottom and top.
Mistake 7: Neglecting horizontal balance. A pack heavier on one side creates asymmetrical strain. Check balance by setting the loaded pack on a table and observing whether it tips. Redistribute until it sits level.
Correcting these mistakes takes minutes and transforms your experience immediately.
Conclusion
How to distribute backpack weight properly boils down to three principles: keep total weight at 20% of body weight or less, place heavy items in the middle zone close to your back, and distribute weight evenly left to right. Adjust your hip belt and load lifters correctly, and most comfort problems disappear.
The difference between a comfortable hike and a painful one often comes down to these details, not gear quality. Expensive equipment with poor weight distribution feels worse than budget gear packed intelligently.
Frequently Asked Questions
What is the 20% body weight rule for backpacking?
The 20% rule is a guideline stating your total pack weight should not exceed 20% of your body weight. For a 150-pound hiker, this means keeping your pack to 30 pounds or less. This ratio helps maintain proper posture, reduces fatigue, and prevents injury during multi-day trips. Beginners should aim for the lower end (10-15%) until they build strength and hiking experience.
Where should the heaviest items go in a backpack?
Place your heaviest items in the middle compartment, close to your back and centered vertically. This positioning creates a stable center of gravity and transfers weight directly to your hips through the hip belt. Keep dense items like water and cooking gear in this zone. Avoid packing heavy gear at the very top or bottom, as this shifts your center of gravity away from your body and strains your shoulders.
How do I prevent shoulder pain while hiking with a heavy pack?
Shoulder pain typically results from the hip belt being too loose or worn too high. Adjust your hip belt so it sits snugly on your hip bones, transferring 65-80% of the load to your hips rather than shoulders. Use load lifters to angle the shoulder straps slightly backward, and tighten your sternum strap to stabilize the pack against your chest. Proper weight distribution zones and limiting pack weight to 20% of your body weight also significantly reduce shoulder strain.
Is a 30-pound backpack too heavy for beginners?
A 30-pound pack is reasonable for beginners on multi-day trips if you weigh 150 pounds or more, staying within the 20% rule. However, first-time backpackers should start with 15-20 pounds on shorter trips to build conditioning and learn proper packing techniques. As you gain experience with weight distribution, posture, and gear selection, you can gradually work up to heavier loads. Focus on mastering the fundamentals before pushing weight limits.
When you’re ready to put these principles into practice, Adventurers Pulse offers tactical backpacks engineered specifically for proper weight distribution. Our packs feature adjustable torso lengths, precision hip belt systems, and load lifter designs that make correct positioning intuitive. Explore our collection and discover how the right gear, combined with proper packing technique, transforms your hiking experience.
This article was written using GrandRanker



0 Comments