
Table of Contents
- Why Tactical Outdoor Equipment Demands a Different Care Routine
- The Right Tactical Gear Cleaning Supplies
- Step 1: Debris Removal and Pre-Cleaning
- Step 2: How to Clean a Tactical Backpack
- Step 3: Drying and Reapplying Water Repellent
- Step 4: Hardware and Fastener Maintenance
- Step 5: Tactical Gear Repair Kit Essentials
- Step 6: Storing Tactical Equipment Long-Term
- Frequently Asked Questions
Last Updated: September 6, 2026
Why Tactical Outdoor Equipment Demands a Different Care Routine
Tactical outdoor equipment is not the same as your everyday hiking gear. It is built from synthetic fabrics like Cordura nylon and polyester, reinforced with MOLLE webbing, and finished with water-repellent coatings that need specific care to survive years of abuse. Understanding how to maintain tactical outdoor equipment starts with respecting that these materials respond differently to detergents, heat, and abrasion than cotton or standard pack cloth.
The most common reason gear fails early is not manufacturing defects. It is improper cleaning that degrades the water-repellent coating or stitches, followed by storage in damp environments that invites mildew. A tactical backpack is load-bearing equipment; every seam and fastener carries weight and must be inspected as part of a preventative maintenance routine.
The good news is that a solid routine takes about 30 minutes after each trip and an afternoon twice a year. Below, we will walk through the exact steps to keep tactical gear functional for a decade or more.
The Right Tactical Gear Cleaning Supplies
Most guides tell you to grab whatever soap is under the sink. That is a mistake. Standard laundry detergents often contain brighteners and fragrances that can leave residues, dulling water-repellent coatings and attracting dirt. The right tactical gear cleaning supplies are specific and inexpensive.
Start with a dedicated technical cleaner such as Nikwax Tech Wash or Grangers Performance Wash. These are formulated to clean synthetic fabrics without stripping durable water repellent (DWR) treatments. You will also need a soft-bristled brush, a microfiber cloth, and a gentle toothbrush for zippers and corners.
Avoid bleach, fabric softeners, and any cleaner with strong solvents. These break down nylon and polyester fibers and accelerate UV degradation. For stubborn stains like tree sap or grease, use a small amount of isopropyl alcohol on a cotton swab, testing on an inconspicuous area first. The National Park Service guidance on outdoor gear care confirms that mild, non-detergent soaps are safest for technical outdoor fabrics.
| Supply | Purpose | Frequency |
|---|---|---|
| Technical cleaner (Nikwax, Grangers) | Cleans without stripping DWR | Every deep clean |
| Soft-bristled brush | Removes embedded dirt | Pre-clean each trip |
| Microfiber cloths | Drying and detailing | As needed |
| Isopropyl alcohol | Spot treatment for sap/grease | Rarely, with caution |
Step 1: Debris Removal and Pre-Cleaning
Skip this step and you will grind grit into the fabric weave, which acts like sandpaper on stitching and accelerates abrasion. Pre-cleaning is the single most important habit for gear longevity.
Start by turning the backpack or gear inside out. Shake out loose dirt and debris. Use your fingers or a dull tool to pick out pebbles and twigs from the MOLLE webbing and hook-and-loop fasteners. Velcro that is packed with dirt loses its grip, and forcing it shut only makes the problem worse.
For muddy gear, let the mud dry completely, then brush it off with a soft brush. Dry mud releases far more easily than wet mud, which you would only push deeper into the weave. This is especially important for tactical apparel and load-bearing equipment that sees heavy field use. Tackle debris removal outdoors or over a trash can to keep the mess out of your cleaning area.
A common mistake is using a wire brush or a stiff scrub pad to speed this up. These tools are too aggressive for synthetic fabrics and will damage the water-repellent coating, leaving you wet on your next trip.
Step 2: How to Clean a Tactical Backpack
How to clean a tactical backpack comes down to three rules: use cold water, use the right soap, and never machine wash unless the manufacturer explicitly allows it. Machine washing can bend frames, damage foam back panels, and snag webbing on the drum.
Fill a tub or large sink with cold water and add the recommended amount of technical cleaner. Submerge the backpack and agitate it gently with your hands for several minutes. Pay extra attention to the back panel and shoulder straps, where body oils and sweat accumulate. Use your soft brush on heavily soiled areas, working in small circular motions.
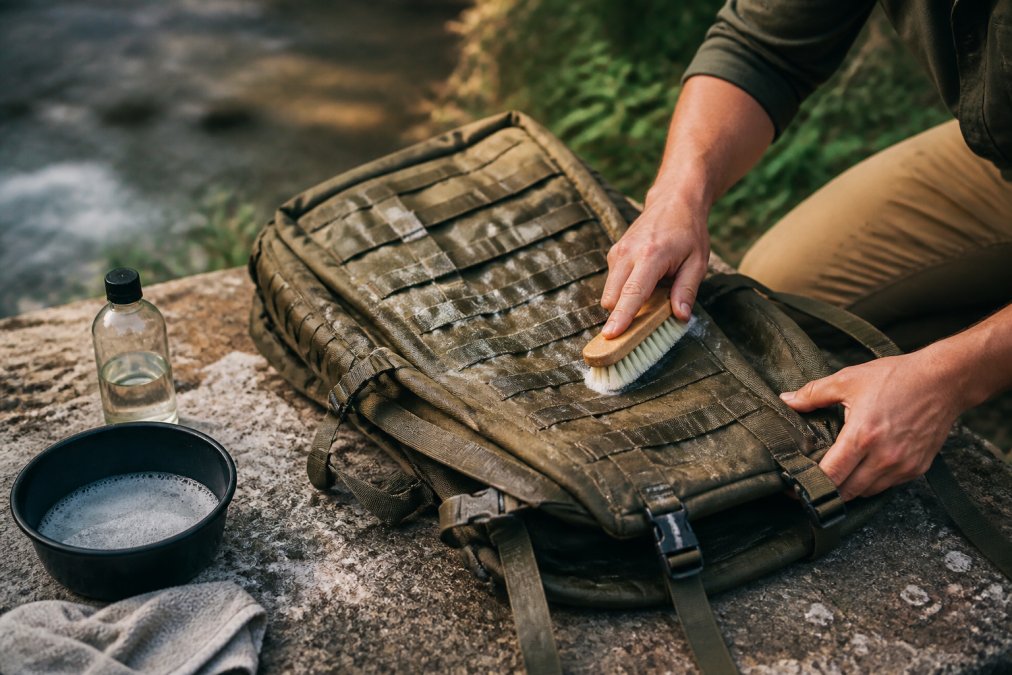
Rinse thoroughly with clean cold water until no soap suds remain. Soap residue attracts dirt and can irritate skin. For the interior, wipe down with a damp microfiber cloth. If the interior has a hydration bladder sleeve, make sure that area is rinsed well and left open to dry. Many packs feature weather-resistant materials that handle this hand-washing method exceptionally well, preserving both fabric integrity and hardware function.
Step 3: Drying and Reapplying Water Repellent
Air drying is the only safe method for tactical outdoor equipment. Never put your gear in a dryer. The heat will melt synthetic fibers, warp plastic buckles, and permanently ruin the DWR treatment. Hang the gear in a well-ventilated, shaded area and allow it to dry completely, which can take 24 to 48 hours depending on climate.
Do not hang a wet pack by its shoulder straps. The weight of the water will stretch the foam and stitching. Instead, drape it over a thick towel rack or lay it flat on a drying rack, opening all zippers and compartments to promote airflow. Mildew prevention starts here: gear stored even slightly damp will develop that musty smell and can grow mold that weakens fabric.
Once the gear is fully dry, test the water repellency. Sprinkle a few drops of water on the fabric. If they bead up and roll off, the DWR is fine. If they soak in, it is time to reapply a DWR treatment. Use a spray-on product designed for the fabric type and follow the instructions precisely, applying in a well-ventilated area and allowing full cure time before use.
Step 4: Hardware and Fastener Maintenance
Zippers, buckles, and hook-and-loop fasteners are the first points of failure on tactical gear. A broken buckle on a chest strap can end a trip. This is why hardware maintenance is a core part of how to maintain tactical outdoor equipment.
Inspect every zipper for smooth operation. If a zipper is sticky, run a zipper lubricant or a paraffin wax block along the teeth. Do not use oil-based lubricants, which attract dirt and can stain fabric. Check all buckles for cracks, especially in cold weather when plastic becomes brittle. Clean the channels of side-release buckles with a toothbrush to remove dirt that prevents a secure click.
For hook-and-loop fasteners, use a stiff brush to lift out lint and debris. If the hooks are bent or matted, you can sometimes revive them by carefully teasing the hooks upright with a pin. When hook-and-loop is beyond repair, replacement is cheap and straightforward. The U.S. Army technical manual on clothing and equipment maintenance emphasizes that preventative maintenance of fasteners significantly extends the service life of load-bearing equipment.
Buckle maintenance also means checking the webbing that passes through them. Frayed webbing near a buckle should be repaired or replaced before it fails under load.
Step 5: Tactical Gear Repair Kit Essentials
Field repair is different from deep cleaning, but every serious outdoor enthusiast should carry a small repair kit. Tactical gear repair kit essentials include items that fix both hardware and fabric, so you can handle problems on the trail rather than ending a trip early.
Your kit should include: a heavy-duty needle and waxed nylon thread for stitching repairs, a few replacement buckles in common sizes, a length of 550 paracord for emergency lashing, tenacious tape or gear patches for fabric tears, and a small tube of seam sealer. These items weigh only a few ounces and can save a trip.
Repairing hardware is almost always easier and more reliable than repairing fabric. A cracked buckle can be replaced in minutes with webbing that is threaded correctly. A torn shoulder strap, however, compromises the structural integrity of the pack and should be professionally repaired or the pack retired. Knowing the difference between a cosmetic fix and a safety-critical repair is essential. Stitching integrity matters most on load-bearing seams; if those are compromised, no patch will restore full strength.
Do not attempt to field-repair a torn load-bearing strap with tape alone. Tape will hold for a short hike, but it will fail under sustained weight. If a critical strap is compromised, shorten your trip and replace the gear.
Step 6: Storing Tactical Equipment Long-Term
Long-term storage for climate control is the angle most gear owners ignore. Tossing a damp, dirty pack into a garage or attic is a recipe for mildew, UV degradation, and pest damage. Proper storage doubles the usable life of your investment.
Store tactical equipment in a cool, shaded area with low humidity. A climate-controlled closet or under-bed storage bin works well. Avoid attics and garages where summer heat can exceed 120 degrees Fahrenheit, which degrades adhesives and synthetic coatings. UV degradation from sunlight is also a concern, so keep gear out of direct light.
Before storage, ensure all gear is completely dry and clean. Loosen all straps and unbuckle buckles to relieve tension on the webbing and plastic. This prevents stress points from forming over months of compression. Stuff the main compartment lightly with acid-free tissue paper or a clean cotton sheet to help the pack hold its shape. Do not use plastic garbage bags, which trap moisture; use breathable cotton storage bags or a large pillowcase.
For tactical apparel, hang items on wide, padded hangers to preserve shoulder shape. For post-deployment decontamination, if gear has been exposed to saltwater or heavy chemical environments, rinse it thoroughly with fresh water and allow it to dry fully before storage. Salt crystals are hygroscopic and will draw moisture out of the air, promoting corrosion of metal hardware and mildew growth.
The golden rule of tactical equipment storage is simple: clean, completely dry, and in a cool, shaded area with breathable airflow. Gear stored this way is ready for action at a moment’s notice.
The American Hiking Society trail maintenance resources echoes this guidance, noting that proper storage and routine inspection are the most cost-effective ways to extend the life of outdoor equipment. A few minutes of care after each trip and a thorough seasonal maintenance session will keep your tactical outdoor equipment performing at its peak for years, saving you money and ensuring your gear is trustworthy when you need it most.
Keeping tactical outdoor equipment in fighting shape is not complicated, but it does demand consistency and the right approach. The real challenge is building the discipline to care for your gear after every trip, not just when it looks dirty. Keeping tactical outdoor equipment in fighting shape is not complicated, but it does demand consistency and the right approach. The real challenge is building the discipline to care for your gear after every trip, not just when it looks dirty. Browse our curated selection of tactical backpacks and outdoor essentials, engineered for durability, comfort, and performance, and go prepared with gear you can trust. Get started with Adventurers Pulse and make every expedition count.
Frequently Asked Questions
Can you wash tactical gear in a washing machine?
Machine washing is risky for tactical outdoor equipment. The agitator can damage MOLLE webbing, hook-and-loop fasteners, and water repellent coatings. Agitation also stresses stitching integrity at stress points. Hand washing with a soft brush and mild detergent is the safest method. If you must use a machine, choose a front-loader on a gentle cycle with cold water and place the gear inside a mesh laundry bag. Always air dry afterward, never machine dry.
What cleaning agents are safe for Cordura and nylon tactical fabrics?
Stick to mild, pH-neutral detergents specifically formulated for technical fabrics. Avoid bleach, fabric softeners, and harsh degreasers because they degrade synthetic fabrics and weaken water repellent coatings. For heavy grime, a solution of warm water and a small amount of technical wash works well. Rinse thoroughly to remove all soap residue. Check the label on your tactical gear cleaning supplies for specific warnings before applying any product.
How often should you inspect tactical equipment for wear and tear?
Perform a visual inspection before and after every trip. Look for loose or broken stitching, frayed webbing, corroded buckles, and worn hook-and-loop fasteners. Check for mold or mildew, especially if gear was stored damp. For frequent users, schedule a deeper inspection monthly. Catching a small issue early prevents a field failure. This preventative maintenance habit is the key to gear longevity.
Is it necessary to re-waterproof tactical outdoor equipment?
Yes, if your gear originally had a water repellent finish. Over time and after repeated cleanings, the durable water repellent (DWR) treatment wears off. You will notice water soaking into the fabric instead of beading up. Reapply a fabric waterproofer designed for nylon and polyester after every few washes or when water stops beading. Ensure the gear is completely clean and dry before applying the treatment.





0 Comments