
Table of Contents
- Why Testing Camping Gear Before the Trail Matters
- The Pre-Trip Gear Inspection Checklist
- How to Check Tent Waterproofing With a Backyard Simulation
- Field Testing Camping Gear: The Home Test Method
- How to Test Camping Gear for Durability and Stress
- Testing Your Sleeping System for Comfort and Warmth
- Recording Results and Tracking Gear Performance
- Frequently Asked Questions
Last Updated: September 5, 2026
Why Testing Camping Gear Before the Trail Matters
The most reliable way to test camping gear is to simulate trail conditions in your own backyard before you ever leave the driveway. This guide walks you through a practical, repeatable process for stress-testing tents, sleeping systems, and stoves so you can identify weak points while a hardware store is still nearby.
Most equipment failures happen on the first night of a trip, not the tenth (outdoorindustry.org). A seam that wasn’t sealed, a stove that won’t light at elevation, or a sleeping pad with a slow leak all share one trait: they were discoverable at home. The cost of finding these issues during a backyard test is an afternoon of your time. The cost of finding them on a mountain is a miserable night or a shortened adventure.
Testing camping gear is a skill, not a chore. You are building a relationship with your equipment, learning its quirks and tolerances so that when conditions get rough, your gear behaves predictably.
The Pre-Trip Gear Inspection Checklist
A pre-trip gear inspection checklist is the fastest way to catch obvious problems before you invest time in deeper testing. Begin with a visual once-over of every item you plan to carry, looking specifically for wear and tear that compromises function.
Work through these items systematically:
- Shelter: Inspect tent poles for cracks or bent segments, check zippers for snags, and verify all stakes are present.
- Sleeping system: Inflate your sleeping pad fully and listen for hissing; inspect your sleeping bag for tears and check the loft.
- Cooking: Test your stove outside with a full canister, check fuel levels, and confirm your lighter or ignition system works.
- Pack: Examine shoulder straps, hip belts, and compression straps for fraying or broken buckles.
- Hydration: Fill your water filter or reservoir and verify flow rates; check for leaks at connection points.
This inspection catches equipment failure before it happens. A common mistake is skipping this step and heading straight for the waterproofing test, which misses a broken zipper that will fail regardless of how well you seal the fly.
How to Check Tent Waterproofing With a Backyard Simulation
The most effective way to check tent waterproofing is a controlled backyard simulation using a garden hose set to a fine mist, not a powerful jet. High-pressure water can force moisture through seams that would never leak under natural rainfall, giving you false confidence in the opposite direction (sciencedirect.com).
Start by setting up your tent with the rainfly fully deployed and all guylines staked. Spray the tent evenly for ten minutes, focusing on the seams, corners, and the area where the fly meets the ground. After the spray session, go inside and run your hand along the interior walls and floor, feeling for dampness.
Pay special attention to the floor bathtub seams and the vestibule zippers, the most common leak points on modern tents. If you find moisture, dry the tent completely and apply seam sealing to the affected areas per manufacturer guidelines, then repeat the test. A tent that passes a second round is ready for the trail, verified in practice rather than trusting the tag’s specifications.
Field Testing Camping Gear: The Home Test Method
Field testing camping gear at home means replicating the conditions of a real campsite as closely as your environment allows. This is not about simply wearing a jacket in the yard; it is a structured method for evaluating gear performance through usability assessment and functional testing.
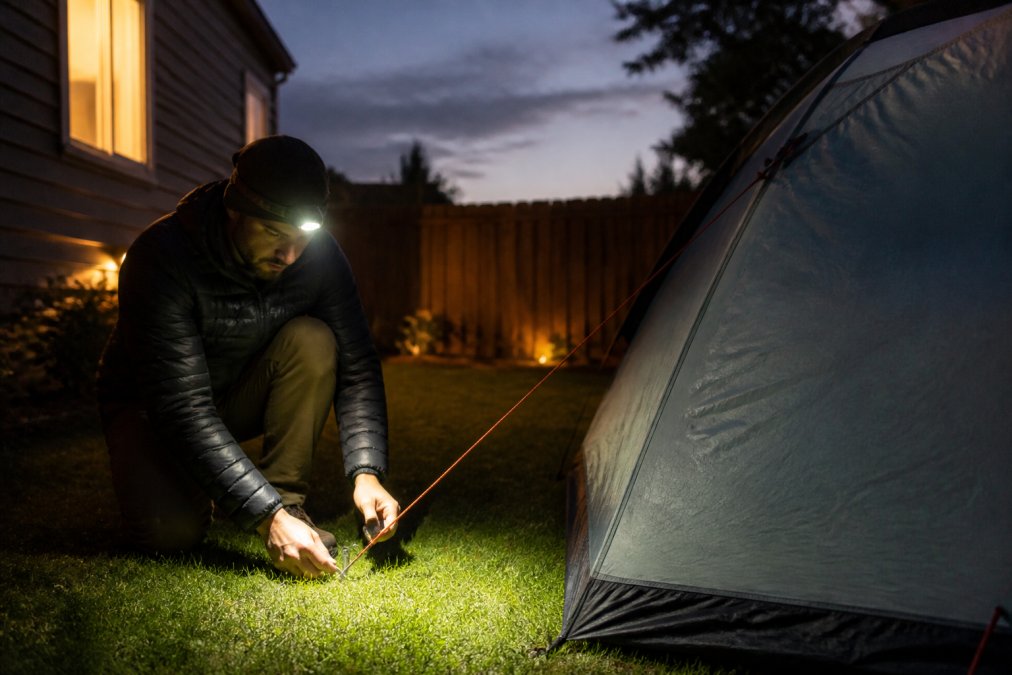
Set up your entire camp, including the tent, sleeping system, and cooking area, exactly as you would on a trip. Cook a full meal on your stove, timing how long it takes to boil water. Inflate your sleeping pad and lie on it for twenty minutes to assess comfort. Practice packing your backpack with your full kit, checking that the weight distributes evenly across your hips and shoulders.
The goal is stress testing your routine, not just your gear. This way you discover inefficiencies in your setup process, like a tent that takes too long to pitch in wind or a stove that requires a windscreen you forgot to pack, insights that make your first real trip feel routine instead of chaotic.
How to Test Camping Gear for Durability and Stress
Generic advice to “push equipment past normal use” doesn’t give you a pass/fail benchmark. To test durability like a quality-control engineer, you need standardized, repeatable stress tests with clear thresholds, how hard to pull, how much weight to hang, and how many cycles to run before calling gear trail-worthy.
The 3-Repetition Load Protocol for Packs and Tents
For load-bearing gear, the most reliable home test is a cycle test. Load your backpack to its manufacturer’s maximum recommended weight (or 40 pounds for a multi-day pack if you don’t have that number). Perform three consecutive lifts from the ground to a table or countertop, simulating a pick-up-and-go motion. After each lift, run your hand along the shoulder strap attachment points, the hip belt buckle, and the load-lifter straps. A pass means no creaking sounds, no fraying threads, and no slippage in the buckles.
For your tent, the equivalent test is a pitch-and-strike cycle. Pitch the tent fully, including the rainfly and all guylines, then strike it, repeating three times in a row without a break to simulate three consecutive camp moves. Watch the pole ferrules (the metal or plastic connectors between pole segments) and the clip attachments that hook the body to the poles. If a clip cracks or a ferrule splits on the third pitch, it will likely fail on the third day of a trail trip.
The Weighted Hang Test for Seams and Straps
A common failure point on cheaper gear is the stitching on compression straps and daisy chains. To test this, use a luggage or fish scale. Attach the strap to a fixed anchor (like a fence post), then pull with 25 pounds of force for 30 seconds. Release and inspect the stitching. If any thread pulls loose or the bartack (the dense zig-zag stitch at the stress point) shows gaps, the strap is a failure risk. This test is particularly effective for tent stuff sacks and backpack compression straps, which often see loads near 20-30 pounds when cinched down.
The Abrasion and Flex Test for Fabrics
For tent floors and pack bodies, the silent killer is abrasion. A simple home test uses a rough surface, a concrete patio or a piece of coarse sandpaper (80-grit) taped to a board. Place the fabric (like a tent footprint or a pack’s bottom panel) on the abrasive surface, place a 10-pound weight on top, and drag the fabric 12 inches toward you. Repeat this drag five times. Inspect for pilling, white stress marks, or actual holes. A tent floor that shows wear after five drags on 80-grit sandpaper will not survive a rocky campsite. This test gives you a concrete, comparable number rather than a vague sense of durability.
Use painter’s tape to mark the exact spot on your gear where you performed the abrasion test. On your next trip, check that spot first. This connects your home stress test to real-world performance, validating your testing method.
The Wind Load Test for Shelters
Most backyard tests ignore wind, the primary structural killer of tents. To simulate wind load without a wind tunnel, use a box fan set on high, placed 3 feet from the tent’s windward side. Run the fan for 15 minutes. Watch the pole structure for excessive flex, specifically, whether the poles bow more than 20 degrees from vertical at the ridgeline. Also listen for flapping that causes the fly to slap the inner tent, indicating poor tensioning. A tent that passes this fan test at 3 feet is roughly equivalent to a 15-20 mph breeze (weather.gov). For a higher wind test, place the fan at 1.5 feet, approximating 25-30 mph gusts. Document the fan distance and the tent’s behavior in your log.
The Threshold for Replacement
A stress test is only useful if you have a clear decision rule. Use this simple triage system after any test:
- Pass: No visible change, no functional degradation. Gear is trail-ready.
- Monitor: Minor cosmetic wear (e.g., slight fraying, a small scuff). Gear is usable, but you must re-test after every trip.
- Fail: Structural compromise (cracked plastic, torn stitching, bent pole). Replace or repair before the next outing. Do not take failed gear into the backcountry.
This standardized approach transforms durability testing from a vague hope into a measurable, repeatable process. You are no longer guessing whether your gear is tough enough; you have a documented baseline telling you exactly how much abuse it survived before you trusted it with your trip.
Testing Your Sleeping System for Comfort and Warmth
The best method for testing your sleeping system is a full overnight test in your backyard, which provides the only accurate measurement of warmth and comfort. A sleeping bag that feels cozy indoors can be drafty and cold at 40 degrees Fahrenheit, and the only way to know is to test it in real conditions.
Set up your sleeping pad and bag on a night that mimics the expected low temperature of your trip. Wear the same base layers you plan to sleep in. After an hour, assess your warmth: if your back is cold, the issue is likely the sleeping pad’s insulation value, not the bag. If your shoulders are cold, the bag may be too large or the hood is not cinched properly.
A critical factor most guides miss is the interaction between your pad and bag. A sleeping bag’s warmth rating assumes a pad with adequate insulation beneath you. Testing your sleeping system as a complete unit, rather than each piece separately, gives you a realistic picture of your comfort level. If you sleep cold, consider adding a liner or a higher-insulation pad before your trip.
Recording Results and Tracking Gear Performance
A notebook with scattered notes is better than nothing, but it won’t reveal the patterns you need to predict gear failure. The most effective system is a structured, repeatable log that captures the same data points every time. This section provides a field-tested template you can copy into a spreadsheet, a notes app, or a physical journal.
The 6-Field Gear Test Log
For every test you perform, record these six fields. Consistency is more important than volume, six fields logged every time beats twenty fields logged once.
- Date: The calendar date of the test.
- Gear Item & Model: Be specific. “Tent” is useless. “MSR Hubba Hubba NX 2-person, 2024 model” is actionable.
- Test Conditions: Temperature, weather, wind speed (if known), and the specific test performed (e.g., “rain simulation with hose on mist setting, 10 minutes”).
- Test Result: Pass, Monitor, or Fail (using the triage system from the durability section). Include quantitative data where possible, like “boiled 1 liter in 4 minutes 30 seconds at 60°F” or “pad lost 10% pressure after 20 minutes under body weight.”
- Maintenance or Repair Performed: Note any action taken, such as “re-sealed bathtub floor seams with Seam Grip” or “replaced zipper slider on stuff sack.”
- Next Test Date: Schedule a re-test if you performed a repair, or set a 6-month check for gear that passed.
The Repair Verification Protocol
Testing a repair is a distinct skill from testing new gear. A patch or seam seal that looks solid can fail under real-world stress. The protocol is simple: after any repair, re-run the exact same test that caused the original failure. If a tent floor leaked during a 10-minute hose test, apply a patch, wait the manufacturer’s recommended cure time (typically 24 hours for polyurethane-based sealants), and run the same 10-minute hose test again. A repair only passes if it survives the identical conditions that caused the original failure. Log the result as “Repair Verified” or “Repair Failed”.
The Seasonal Trend Review
Your log becomes powerful when you review it quarterly. Every three months, scan for items that show a pattern of “Monitor” results. A sleeping pad that loses air slightly faster each trip, or a stove that takes 15 seconds longer to boil water each season, is telling you something. These gradual degradations are the most common cause of mid-trip failures. The log turns these subtle shifts into visible trends.
Digital Template: The Gear Test Spreadsheet
For a ready-to-use structure, create a spreadsheet with these column headers:
Date | Gear Item | Model/Year | Test Type | Conditions | Quantitative Result | Pass/Monitor/Fail | Repair Action | Repair Verified? | Next Test Date
Populate one row per test. Use a simple color code, green for Pass, yellow for Monitor, red for Fail. This visual system lets you scan your entire gear history in under a minute before any trip. Print the summary page or screenshot it to your phone for a pre-departure checklist.
A gear log is not a diary; it is a predictive tool. The camper who documents six data points per test will catch a failing stove or a delaminating sleeping pad three trips before the camper who relies on memory. The log is the difference between hoping your gear is ready and knowing it is.
Frequently Asked Questions
Can I trust online gear reviews instead of testing gear myself?
Professional reviews are useful for narrowing down options, but they cannot account for your specific body type, camping style, or the particular unit you receive. A pre-trip inspection and a quick home test catch manufacturing defects and help you learn how your gear performs before you depend on it in the backcountry. Think of reviews as a starting point and your own testing as the final quality check.
What is the best checklist for camping gear before a trip?
A solid pre-trip gear inspection checklist covers your shelter, sleep system, cooking setup, and safety items. Inspect your tent for holes, broken zippers, and bent poles. Check your sleeping bag for tears and its loft. Test your stove for fuel leaks and proper ignition. Verify your headlamp batteries and confirm your first-aid kit is stocked. This process takes under an hour and prevents most common equipment failures.
How can I simulate harsh weather conditions for gear testing at home?
You can create meaningful weather simulations without a lab. Use a garden hose with a spray nozzle on its most intense setting to test tent waterproofing, focusing on seams and the fly. Set up your tent in the yard on a windy day to check stake holding power. Test your sleeping bag’s warmth by opening a window on a cool night. These methods reveal weaknesses in a controlled, safe environment.
How do professional outdoor gear testers evaluate equipment?
Professional testers follow standardized protocols that stress gear in controlled environments before field use. They measure objective data like waterproof ratings in millimeters, insulation loft, and fabric tear strength. They also document subjective factors like comfort and ease of use. You can apply a simplified version of this method, focusing on consistent checks and detailed notes, to build confidence in your own gear.
This article was written using GrandRanker




0 Comments